Another weekend has come and gone on the Bug project. More bits are on the way here and many bruises and scratches later we survived.
I required help this weekend that will extend through some of the week as we get ready for the arrival of my orders. First we pulled the engine and the one of the heads.
While he cut pieces of remaining floorplans out, I cleaned the head. I used kerosene for a lot of it and it works remarkably well. First you carefully scrape dirt and oils and accumulated gunk off, pick it out of holes, and check mating surfaces. Then you get the brushes to it. After that you can get to the kerosene with not too harsh scubbies and cotton balls. A razor blade is useful if you avoid mating surfaces.
The valves are rusted but not bad. I will need a valve cover and rods. As I already knew, the most work will be interior. I have to rebuild some mating surfaces for the floor pans to seal. I have a plan and what I need on the way.
The most entertaining aspect this weekend was lifting the body off the frame to get better access and view. It is remarkably easy on a bug and really helped access. Pulling the motor was easy too which is a nice change.
S
o…it’s coming but is slow. I have a lot of hurry up and wait since I order parts when I get paid and prep and evaluate in between.
The process of restoration always fascinates me. The stages of cleaning and evaluation that move into collection of starting needs and price lists. From there you fix parts, clean parts, replace parts, restore finishes, and test things hopefully one at a time.
What I fail at is doing one task at a time. So, in typical fashion I am restoring 2 vintage sewing machines at the same time as my car. Both are Singer, one is a treadle and one us a single stitch electric from the 40’s.
But back to why you came here…the bug is ongoing. I have stripped the interior except the headliner. The fuel tank is out. The engine is stripped and loose but not out. I have new floorplans to install but need to remove the jack points first. So there is progress both mechanical and aesthetic. Having performed extensive rust treatment inside, I still must treat the exterior of the tank. The interior is pretty clean.
I am preparing to order exhaust and probably a wiring harness so you know what the next updates will likely be.
First, a painting. this is one of my favorites, a watercolor done based on the cliff dwellings I visited last year.
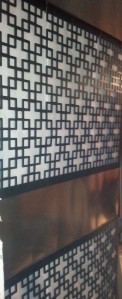
there is also a home project, mostly done. A shoji screen for the pantry we built recently. We still are changing one wall and have not done the door frames yet. I really like how the metal sheets came out in the center and on the frame above. This project completely changed about 4 times before getting this far.
The other is a painting developed when I was in Florida. Researching the older cultures in Mexico and Central America I designed this, using correct designs and architecture but mixed my own way.
I need to get my good camera working, this one is taking very pale images.
First, the coupon code OCTOBER is still effective on my Etsy store though the lowered pricing has ended.
Wormy Wood I am considering for a project
We have been trying to finish projects around the house this week and next so I have one of those to show.
Wormy Wood, other side
It is a cat tree built into the corner using a favorite branch of a couple of the cats. There is a small red shelf midway up for them to play on. I left short branches for them to grab and hang from since they love that.
Also there are several drawings from my notebook. These are pencil.
Another floor from our work. It needs grout and cleaning, but it adds a lot of light to the room. I’m doing trim in the bedroom today and probably painting the living room. The last floors will be the closets in the bedroom. I haven’t actually posted pics of the Laundry room floor.
My stone floor, all done except for sealing. I avoided showing the rest of the room, haven’t finished the trim yet and I’m packing in that room. This is our new bedroom floor. I laid the tile in one day, first time ever laying tile. It uses at least 15 types of tile, different colors,patterns, materials, and thicknesses. I had to change mortar part way through because we misjudged the amount and the store only had one type left. I learned a lot doing this floor and am quite pleased with it. I grouted it a couple days later and will seal it soon.
I would love this in more of the house, though I found a really neat idea for our red kitchen the other day using pennies.
House will be ready to rent soon.
Writing, art, Business, and practice, any medium is fair game.